
How To Measure Every Parts Of A Bottle: Giude On Anatomy of A Bottle
Understanding the anatomy of a bottle and measuring parts of a bottle is crucial for purchasing bottle packaging and preforms. Mastering the dimensions of each part of a bottle will help you find the right preforms, caps, pump heads, and other accessories. It also supports better packaging design practices and overall procurement cost calculations.
In this article, we will introduce the key parts of a bottle, along with measurement methods and tools for specific sections, to assist you in making more informed purchasing decisions.
Essential Tools To Measure Parts Of A Bottle
Before introducing the anatomy of a bottle and the measurements for each part, it’s essential to know the necessary tools first. This foundational knowledge will facilitate our subsequent explanation of each tool’s specific application.
Vernier Caliper
The vernier caliper is a commonly used bottle measurement tool. It can measure not only the dimensions of the bottle body (e.g., bottle depth, diameter, or width )but also smaller, more precise components such as the bottle neck finish and cap.
Typically, a vernier caliper with an accuracy of ±0.1 mm and a measuring range of 0–150 mm is sufficient for bottle measurements. However, for PET preform measurements, it is recommended to use a vernier caliper with a higher accuracy of ±0.01 mm.
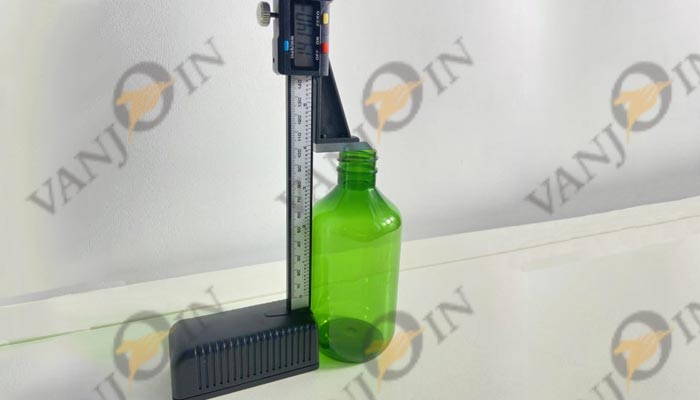
Height Gauge
While vernier calipers or standard rulers can measure bottle height, we recommend using specialized height gauges for bottles with a capacity of more than 100ml.
These precision instruments provide accurate height measurements with digital readouts, eliminating reading errors. Thanks to its stable base, a height gauge offers even greater convenience compared to using vernier calipers for bottle height measurements.
When using a height gauge to measure bottle packaging, we recommend selecting a model with a measuring range of at least 0-300mm. This range is suitable for testing most bottles under 1000ml (including pump heads). For bottles of 1 liter or larger, we advise using a height gauge with a minimum range of 0-500mm, as such bottles typically reach heights of at least 300mm (including pump heads).
Electronic Precision Scale
For measuring bottle capacity, we typically use this type of electronic precision scale. When measuring the weight of preforms, however, a high-precision electronic scale with an accuracy of 0.01g or 0.001g is required.
When selecting such scales, it is important to verify whether their measurement range is suitable for bottle capacity testing, as some scales have a maximum capacity of only 300g.
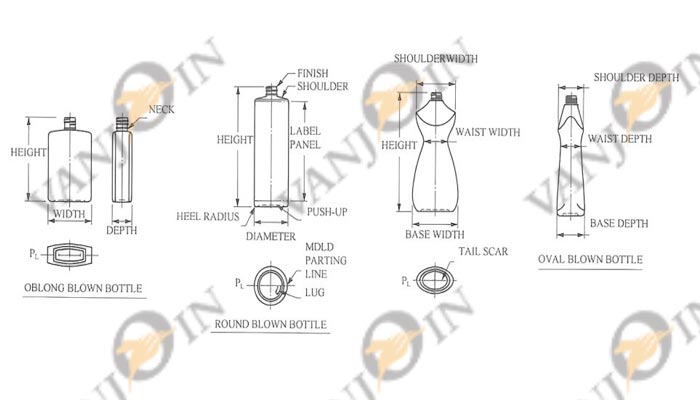
Anatomy Of A Bottle
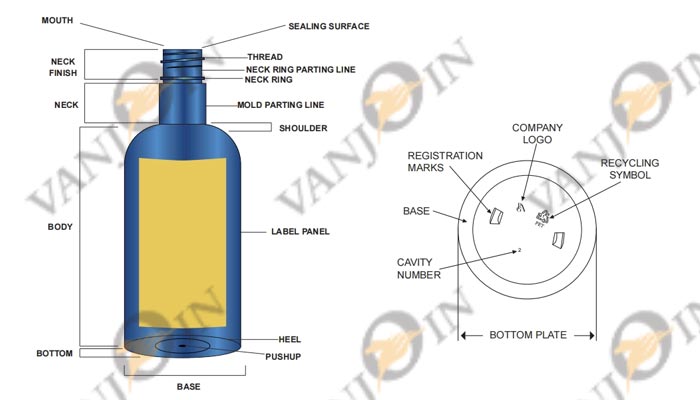
Bottle Mouth
The bottle mouth, located at the top of the container, is primarily characterized by its inner diameter. This dimension serves not only as the critical channel for product filling but also as a key indicator of the packaging system’s sealing performance.
If your bottle requires an aluminum foil seal for the SEALING SURFACE of the bottle, then you will need to measure the outer diameter of the bottle mouth
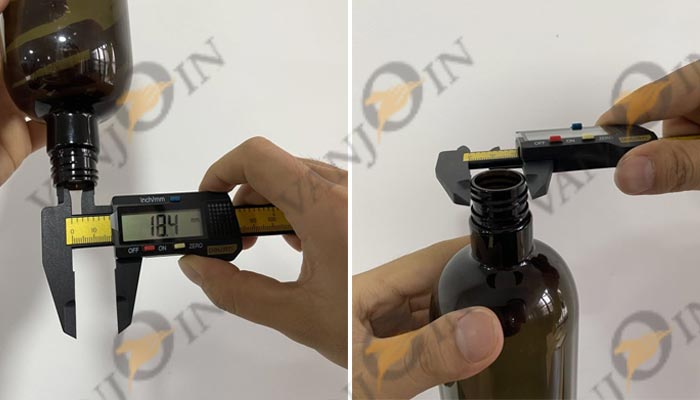
For aqueous formulations (e.g., toners, makeup removers), precise measurement of the inner diameter ensures proper sealing plug compatibility, preventing leakage during transportation. To measure the inner diameter of the bottle mouth, invert the bottle and use the shorter internal jaws of the vernier caliper for accurate measurement.
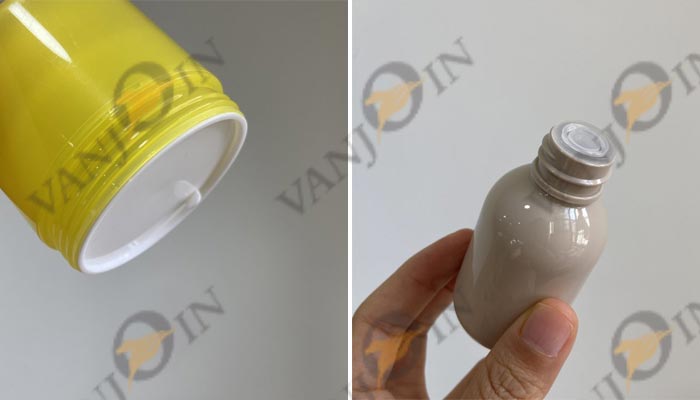
In contrast, wide-mouth containers (e.g., cream jars) require accurate inner diameter verification to select compatible sealing discs. Though often overlooked as disposable post-opening, these discs significantly enhance seal integrity. Consistent use helps prolong product shelf life by minimizing oxidation and preserving efficacy. A properly sized sealing liner should remain securely in place when the empty cream jar is inverted.
Neck Finish
The neck finish section extends from the bottle mouth to the neck ring below (support ring of the preform). As the final stage in preform injection molding, this is how it gets its name.
Typically, the measurement of the neck finish is to ensure proper pump or cap compatibility, and it requires using vernier calipers.
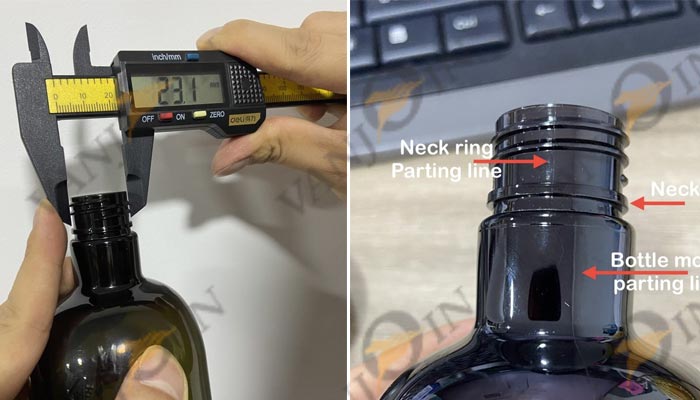
When you measure the bottle neck finish, the longer external jaws of the vernier caliper must align with parting lines of the neck finish (neck ring parting line) on both sides, while ensuring the caliper jaws do not contact the neck ring. Which means the measurement must exclusively cover the THREAD section, but without including the NECK RING’s dimensions.
It is worth knowing that the parting lines on the bottle body and neck finish section may not always align due to preform positioning during blow molding, but this does not affect the bottle’s core performance.
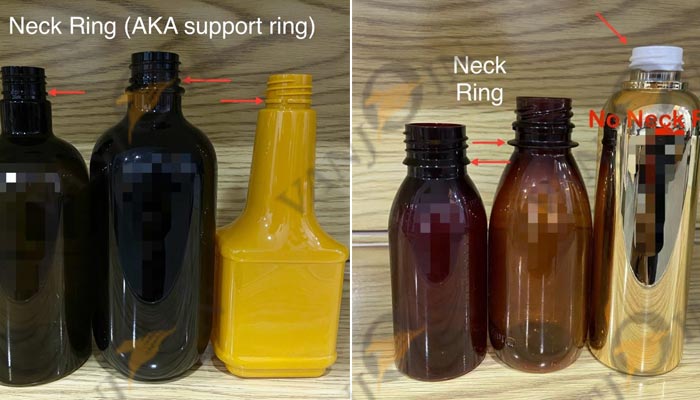
Neck Ring
The neck ring (AKA support ring) serves to stabilize the preform during blow molding, preventing displacement or tilting that could compromise the final bottle shape. However, not all plastic bottles feature this structure. Typically, blow-molded bottles include a support ring, whereas extrusion-molded PE bottles or single-stage PETG bottles lack one—this distinction stems from their production processes, which involve no preform and thus require no support ring.
Most blow-molded PET bottles incorporate a support ring in their neck finish. Though inconspicuous, this feature delivers critical functional benefits:
Transfer Stability: Enables secure robotic handling of preforms on automated injection/blow molding lines, preventing slippage during transport.
Deformation Resistance: Reinforces the neck region’s structural rigidity, minimizing distortion during high-temperature blow molding or logistics stress.
Stress Distribution: Dissipates cap-torque forces across the neck area, preventing thread cracking from concentrated pressure points.
Sealing Enhancement: Provides a positive stop for certain cap designs (e.g., snap-on closures), ensuring consistent compression against the ring’s lower edge for leak-proof performance.
Cap Positioning: The notched design serves as a torque limiter, guaranteeing flip-top caps and other closures consistently seat at the predetermined orientation. Make sure the flip-top cap mouth aligns with the brand’s printing logo.
As the pictures show above, you may notice that beyond the bottle body, the neck ring also offers customization potential for aesthetic and functional design. Although its design costs typically exceed those of the main container, brands increasingly prioritize customized support rings. The higher investment inherently enhances anti-counterfeiting protection—a strategic tradeoff many premium brands willingly embrace.
Bottle Neck
To clarify the distinction between the neck finish and bottle neck, we define the bottle neck as the section between the neck finish support ring (neck ring) and the shoulder transition. While neck dimension measurements hold limited functional significance, these specifications are primarily designed to enhance aesthetic appeal and optimize user experience.
Bottle Shoulder
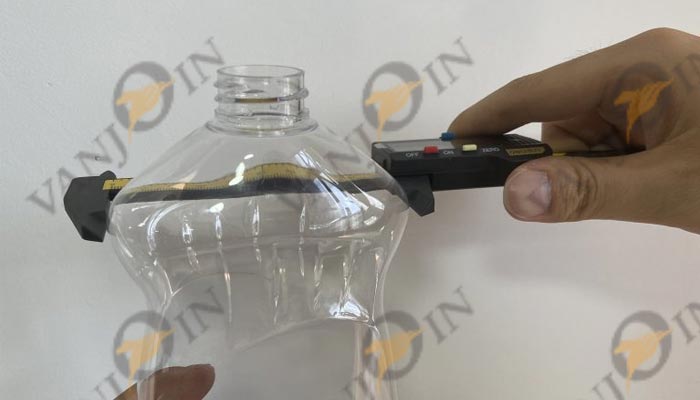
The bottle shoulder, connected to the neck, forms the first transition zone between the bottle neck and the body. For bottles requiring external carton packaging, measuring the shoulder width is essential to determine carton/transport box dimensions and overall packaging procurement costs.
It should be emphasized that due to the curved profile of the shoulder, always use a vernier caliper to measure the maximum width horizontally. Avoid vertical measurements from the top of the shoulder, as this can yield significant errors—horizontal and vertical measurements may differ by ≥7mm.
Bottle Body
The parameters required for measuring parts of a bottle depend primarily on its design. For standard cylindrical bottles, it is generally sufficient to measure the height from the shoulder to the base and the diameter, which allows for the approximate calculation of the printable area (LABEL PANEL). However, measurements become more complex for square or irregularly shaped bottles, as their unique geometries require additional dimensional considerations.
When clients purchase bottles from us, we always provide the die line of the bottle to facilitate design communication with their designers. Therefore, you don’t need to worry about measuring different bottle parts for complex bottle shapes—we’ll handle it for you, reducing your design coordination efforts.
Bottle Height
The height of a bottle typically refers to the overall height from the bottle mouth to the base. The bottle height not only affects packing and shipping costs but, more importantly, serves as a key reference for determining the tube length of the pump head accessory.
Additionally, the neck finish height is crucial for matching a compatible pump head. For cylindrical bottles, there should be a small gap between the lower edge of the pump collar and the bottle shoulder to ensure a proper seal. However, this gap should not be too large—generally, keeping it under 1mm is ideal for both functionality and aesthetics.
Label Panel
The cost structure for labeling extends beyond just label material considerations – it fundamentally incorporates both surface area requirements and application frequency. Standard cylindrical containers typically permit single-pass labeling, whereas geometrically complex designs like square bottles often necessitate multiple labeling passes to achieve full coverage.
The variety of labeling materials available can make procurement decisions particularly challenging. To simplify this process, our packaging solutions include customized material recommendations based on your desired visual presentation and functional requirements, eliminating the guesswork from your material selection.
Heel
The heel is the transitional curved area between the bottle body and the base. Like the shoulder, it is a critical design element, but more importantly, it serves as a key structural component of the bottle.
Special attention must be paid to its curvature design and dimensional balance with the bottle body and base. While aesthetics are important, the heel must also ensure structural integrity, making the bottle easy to handle and resistant to tipping.
Push up
The push-up refers to the inwardly curved structure at the center of the bottle base. Its primary function is to create a ring-shaped supporting surface, ensuring enhanced stability when the bottle stands upright, while also improving the base’s pressure resistance to prevent breakage during filling or transportation.
Most plastic bottles feature some degree of push-up design, whether made of PE, PP, or HDPE. For these lighter materials with relatively low compressive strength, the recessed base significantly improves stability. In contrast, some glass bottles may omit this feature, as the inherent weight of glass and its higher resistance to deformation naturally ensure stable placement even without a push-up design.
Bottle Base
Bottle base designs may vary depending on material, manufacturing process, and producer standards. For cylindrical or conical plastic bottles, there will always be a recessed registration point at the base to ensure proper alignment for front/back printing differentiation.
However, square bottles or certain glass perfume bottles may omit this registration indentation, as their structural design already provides clearly defined surfaces for print artwork placement.
For plastics, different manufacturing processes and materials significantly influence base formation. For instance, most PE bottles feature a noticeable parting line on the base due to their molding process, while PET bottles or injection PP bottles typically lack this characteristic. As for glass bottles, even with identical material composition, variations in production molds create distinct base patterns. These patterns were originally designed to increase friction for more stable placement.
When it comes to corporate logos, their placement can vary significantly. Some manufacturers may imprint their logo on less prominent parts of a bottle, such as the base, especially if the bottle design itself is patented. These logos are typically molded into the design and cannot be removed.
For brands, logos can be placed on any visible bottle parts—whether on the cap, neck, shoulder, or elsewhere—depending on the brand’s preference. Some brands choose to engrave their logos directly into the mold, which not only ensures consistency but also increases the cost of counterfeiting, helping to reduce the risk of imitation products.
Bottle Capacity
When designing bottle molds, we typically measure the full-to-brim capacity as a reference. However, this isn’t the universal industry standard – manufacturers may adopt their capacity definitions. Some measure liquid volume only up to the shoulder position, reserving headspace for pump heads, droppers, or other accessories, while still labeling it as ‘full capacity’.
Manufacturers always use water for standard capacity measurements. If your product contains viscous liquids, physical sample testing is required to determine the actual filled product volume or weight.
Important note for measurement: Always tare the container weight before adding contents for accurate measurement.
The Importance of Measuring Bottle Parts
Understanding how to measure each component of a bottle goes far beyond design—it is fundamental to the entire packaging process. The dimensions of bottle parts serve as a universal “language” throughout the product lifecycle, transforming design concepts into precise manufacturing standards while ensuring performance, usability, and continuous improvement.
By examining the anatomy of a bottle, we reveal the critical roles played by each section. Measurements such as the neck finish and bottle height directly impact sealing effectiveness and compatibility with closures or pumps. This article aims to help you explore new possibilities in bottle design while mastering the essential measurement techniques for different parts of a bottle.
If you have any further questions about measuring bottle parts, don’t hesitate to contact us. Our experts are ready to provide guidance and customized packaging solutions tailored to your needs.
Related Information