
Mist Spray Bottle Repair: 10 Effective Ways to Get It Working Again
There are plenty of methods online for fixing mist spray bottles, but trying each one without a clear approach can be incredibly frustrating. What you need is to accurately identify the problem so you can quickly find the right solution.
Understanding the internal components of a mist spray pump is essential before diagnosing any issues. Knowing the function and location of each part will help you repair it faster and avoid unnecessary disassembly or damage. Additionally, it will give you a better understanding of how the pump works and how to maintain it, preventing future problems.
Spray Pump Components
There are two common types of spray bottles: one is for skin care products with a fine mist spray pump, and the other is for household cleaning and gardening, which is typically a trigger spray pump. Their internal structures and spray characteristics are different.
Here, we provide a detail of the internal structure of both types of spray pumps. You can use the images and descriptions to understand their components and functions better.
Before diagnosing the cause of a spray malfunction, we recommend not disassembling the spray pump to avoid losing or damaging parts due to improper handling.
Fine Mist Sprayer

This type of mist spray bottle features a small nozzle aperture, which produces a fine mist, making it suitable for facial and body use. These bottles typically have a smaller capacity for portability. The internal structure and main components are as follows:
* Nozzle: Atomizes the liquid to create a fine spray.
* Actuator (spray head):Activates the spray mechanism when pressed, pushing the liquid into a spray form.
* Steam: Connects the actuator and nozzle, transmitting the pressure to internal components.
* Sub-steam: Connects the actuator and nozzle, transmitting the pressure to internal components.
* Seal (Gasket): Seals the various components of the spray pump.
* Glass Ball: Prevents liquid from flowing back.
* Closure: Secures the pump head to the bottle, ensuring a tight connection.
* Piston: Pushes the liquid upwards when pressed, creating the necessary pressure to drive the liquid through the nozzle.
* Housing: Encloses and protects all internal components of the spray head, maintaining overall structural stability.
* Spring: Assists in returning the spray pump head to its original position, ensuring proper function.
* Spring Chamber: Houses the spring and, together with the piston, controls the liquid flow.
* Dip Tube: Guides liquid from the bottom of the bottle to the pump core.
Trigger Spray Bottle
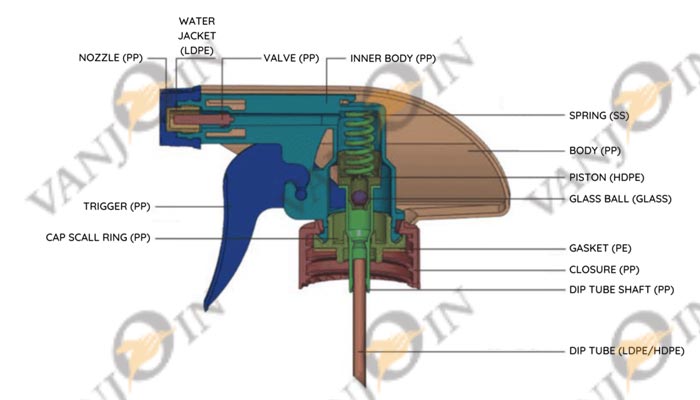
The internal components of trigger spray pumps and skincare fine mist spray pumps actually have many similarities. However, due to differences in the assembly structure of the parts and the size and design of the nozzles, they exhibit significant differences in their performance.
This type of mist spray bottle features a larger nozzle aperture and tube diameter, allowing for long-range spraying, ideal for household cleaning, gardening, and large-area applications. The ergonomic trigger design minimizes fatigue during extended use.
There are actually many types of pump heads. We have provided a detailed overview of the types commonly used in skincare and cosmetic spray bottles on LinkedIn. Feel free to visit and read for more information.
Why The Mist Spray Bottle Stop Spraying
Although the internal structure of a spray pump can be quite complex, the working principle of a spray bottle is relatively straightforward. Pressing the spray head or pulling the trigger moves the internal piston of the pump, creating a vacuum inside the bottle. This vacuum draws the liquid up from the bottle into the pump chamber, which is then atomized and sprayed out through the nozzle.
The reasons for spray bottle malfunctions can generally be attributed to one of the following 10 issues, each of which we have provided specific solutions for your reference.
Air Blockage In Actuator
If your mist spray bottle is overfilled, has uneven internal pressure, or if the actuator does not fully match the pump clousre, it may cause poor spray performance or prevent spraying altogether.
Solutions for air blockage in actuator: This issue often occurs with skincare mist spray bottles, especially for those of aluminum spray can. If the liquid is not overfilled, you can try rotating the actuator 180° clockwise or counterclockwise and then see if it sprays properly.
Alternatively, remove the existing actuator and replace it with a smaller one for better performance.
Air Blockage In Dip Tube
This issue often occurs with aluminum mist spray bottles, especially those filled with paint. When left unused for extended periods, the chemical components inside can settle, and the internal pressure can become uneven, leading to blockages in the dip tube.
Solutions for air blockage in dip tube: You don’t need to disassemble any parts; simply try inverting the aluminum can and press the actuator for a while to release any excess gas. Then, turn it back over, and it should be able to spray normally.
If detachable, remove the pump head from the bottle. Then, press the actuator or pull the trigger to expel all the liquid with bubbles from the tube. Afterward, reattach the pump head to the bottle and check if it sprays properly.
Nozzle Or Actuator Too Tight
When the spray head cannot be pressed down or the trigger on a hand-held mist spray bottle cannot be pulled, first check if the nozzle is locked or overly tightened. Some spray pump heads are intentionally tightened during installation to prevent leakage during shipping, requiring a certain startup mechanism when the customer receives the bottle.
Solutions for tight nozzle and actuator: Try rotating the spray actuator or nozzle to activate the pump’s startup mechanism. This usually resolves the issue and restores normal spraying.
Nozzle Clogs
This is the most common issue for both types of spray bottles. When a bottle isn’t used for a long time, residual liquid in the nozzle can react with air, oxidize, or form dry residues, leading to clogging.
Solution for Clogged Nozzles: Here are several methods to clear a clogged nozzle. Start by removing the pump head from the bottle and detaching the dip tube. Submerge the entire pump head in water, then try pressing or pulling the trigger a few times.
If it still doesn’t spray, soak the pump head in warm water (no more than 70°C) for 10-15 minutes. Afterward, gently clean the nozzle using a toothbrush, needle, or toothpick. Finally, reattach the dip tube and test the spray while it’s still in the warm water. This process usually clears out any small debris in the nozzle.
If your mist spray bottle contains more than just water-based products, such as special acidic or alkaline substances, you can soak the nozzle in vinegar for more than 30 minutes. For clogs caused by oil-based substances, sticky materials, or dried chemicals, soaking the nozzle in alcohol can be effective.
Here’s another more forceful but straightforward method, though it depends on the sturdiness of the bottle. Without disassembling any pump components, you can firmly press the bottle. This pressure can push out any debris or trapped air through the pump, allowing your spray bottle to start working again.

Spring Chamber Clogs
If your mist spray bottle can be pressed and water can be drawn up, but it gets stuck in the spring chamber and cannot be sprayed out, it is likely due to a blocked spring chamber or a damaged spring that cannot return to its normal position.
Solutions for chamber clogs: You need to disassemble the pump head, remove the spring, and clean the spring chamber. Check the spring’s return function by pressing it. If the spring returns to its normal position, the mist spray bottle should function properly after cleaning the spring chamber.
If the spring is damaged, it is advisable to replace the pump head. Ensure you disassemble the pump head on a clean, organized surface to avoid losing any parts during reassembly.
Sealing Problem
If your mist spray bottle has been dropped or subjected to a strong impact, the internal components of the pump head may become misaligned or loose. This can lead to issues such as the bottle not spraying properly or leaking while spraying. In most cases, this is due to a displaced or damaged gasket, which compromises the seal inside the spray pump.
Solution for Poor Sealing: Remove the pump head from the bottle and gently shake the pump housing to check for any looseness. Inspect the bottom gasket for any signs of damage.
If you find that the gasket is loose, carefully remove it (without disassembling the spring and glass ball inside the pump), then firmly reinsert the gasket to ensure a proper seal. If the gasket is damaged, you’ll likely need to replace the entire pump head, as sourcing and replacing gasket components yourself can be both risky and costly, making it an impractical solution.
Dip Tube Clogs
This issue may seem unlikely but is often overlooked by many people.
Solution for a clogged dip tube: It is recommended to remove the dip tube from the pump housing and clean it using a fine brush or pipe cleaner with clean water. Finally, cleaning the area at the end of the pump housing where the dip tube connects is also necessary.
Dip Tube Damage
Due to prolonged use or temperature changes, the dip tube inside a spray bottle may develop minor cracks. Since dip tubes are usually transparent and made from thick material, these small damages can be hard to detect. Cracks in the dip tube can affect the bottle’s functionality and liquid flow.
Solutions for damage dip tube: Inspect the dip tube under bright light for any cracks or holes. You can gently stretch and bend the tube to check for damage. If cracks are found, the dip tube should be replaced.
If the cracks are near the bottom and the tube is long enough not to affect liquid pickup, you can cut off the damaged section.
Insufficient Liquid
Sometimes, if there is too little liquid in the bottle, it can lead to inadequate internal pressure or cause the suction tube to fail to fully immerse in the liquid, which may result in the spray bottle not functioning properly.
Solutions for Insufficient Liquid: Refill the mist spray bottle with the original product to ensure its proper operation.
Incompatibility Between the Liquid and the Spray Pump
While the main material used for making pump heads is PP (polypropylene), the internal components are made from various materials such as stainless steel springs, glass balls, and PE (polyethylene) gaskets.
Therefore, when choosing a spray bottle for a product, it’s essential not only to consider the compatibility between the bottle and the product but also to ensure compatibility between the pump head and the product’s ingredients. If the product is incompatible with the internal components of the pump head, it could lead to issues like corrosion, swelling, or shrinking of the parts.
Sometimes, the signs of incompatibility aren’t immediately visible, but they can cause your spray bottle to gradually become harder to use, even if it has been stored properly without any drops or impacts. However, the internal components may still be deteriorating over time.
Solutions for Incompatibility between the liquid and the spray pump: Even if you disassemble the pump head for a deep cleaning and then reassemble it, the incompatibility issue cannot be resolved. At this point, your only option is to request a return from the seller. If the spray malfunction occurs within two weeks of purchase without any apparent cause, it is most likely due to incompatibility between the product and the pump head.
Usage and Maintenance Tips For Mist Pum
Keep The Nozzle Clean
Regular cleaning of the nozzle is recommended. For cosmetic mist spray bottle with complex ingredients that tend to oxidize and form clumps, periodically wipe the nozzle with a damp soft cloth to prevent residue from clogging the spray hole. For spray bottles with larger nozzles, a simple cleaning once a month is advisable.
Store Properly
Keep the mist spray bottle in a cool, dry place, avoiding exposure to high temperatures or direct sunlight to prevent accelerated aging of the bottle and nozzle. Spray bottles used in the bathroom and kitchen should ideally be stored in a cabinet to avoid moisture and grease from accumulating on the nozzle, which could affect future use.
Regularly Release Trapped Air
For thicker spray products, if the spray bottle hasn’t been used for a long time, air may accumulate inside the pump. Try spraying while holding the bottle upside down to expel excess air, ensuring smooth spraying afterward.
Conclusion
Here we’ve outlined around ten common issues that can cause spray pumps to malfunction, along with their solutions. we hope this information proves helpful and insightful. For those interested in replacing your mist spray bottles or exploring different styles, please stay tuned to updates on our website’s product page, where we regularly feature new products for you to choose from.